Linux 编译安装 PHP 开发环境
整理下Linux服务器下搭建LNMP平台的web环境相关操作。
基本流程
1. 安装 Linux
2. 准备编译环境
3. 安装nginx
4. 安装mysql
5. 安装php-fpm
6. 测试访问
步骤一:安装 Linux
本文主要说明手动安装LNMP平台的操作步骤,此步骤可自行虚拟机安装 Linux,或购买相关云服务器并安装镜像。
Centos:https://www.centos.org/download/
Ubuntu:https://www.ubuntu.com/download/desktop
步骤二:准备编译环境
打开一个终端,登录服务器:
ssh user@IP回车,输入正确的密码后再回车即可登录。
1、系统版本说明
[root@bogon ~]# cat /etc/redhat-release
CentOS Linux release 7.5.1804 (Core) 注:该版本为本博客记录时参考的系统版本。您的实际使用版本可能与此不同,下文中的nginx,mysql,及php版本,您也可以根据实际情况选择相应版本。
2、关闭 SELINUX
修改配置文件,重启服务后永久生效。
[root@bogon ~]# sed -i 's/SELINUX=.*/SELINUX=disabled/g' /etc/selinux/config命令行设置立即生效。
[root@bogon ~]# setenforce 0步骤三:安装 Nginx
Nginx是一个小巧而高效的Linux下的Web服务器软件,是由Igor Sysoev为俄罗斯访问量第二的Rambler.ru站点开发的,已经在一些俄罗斯的大型网站上运行多年,目前很多国内外的门户网站、行业网站也都在是使用Nginx,相当稳定。
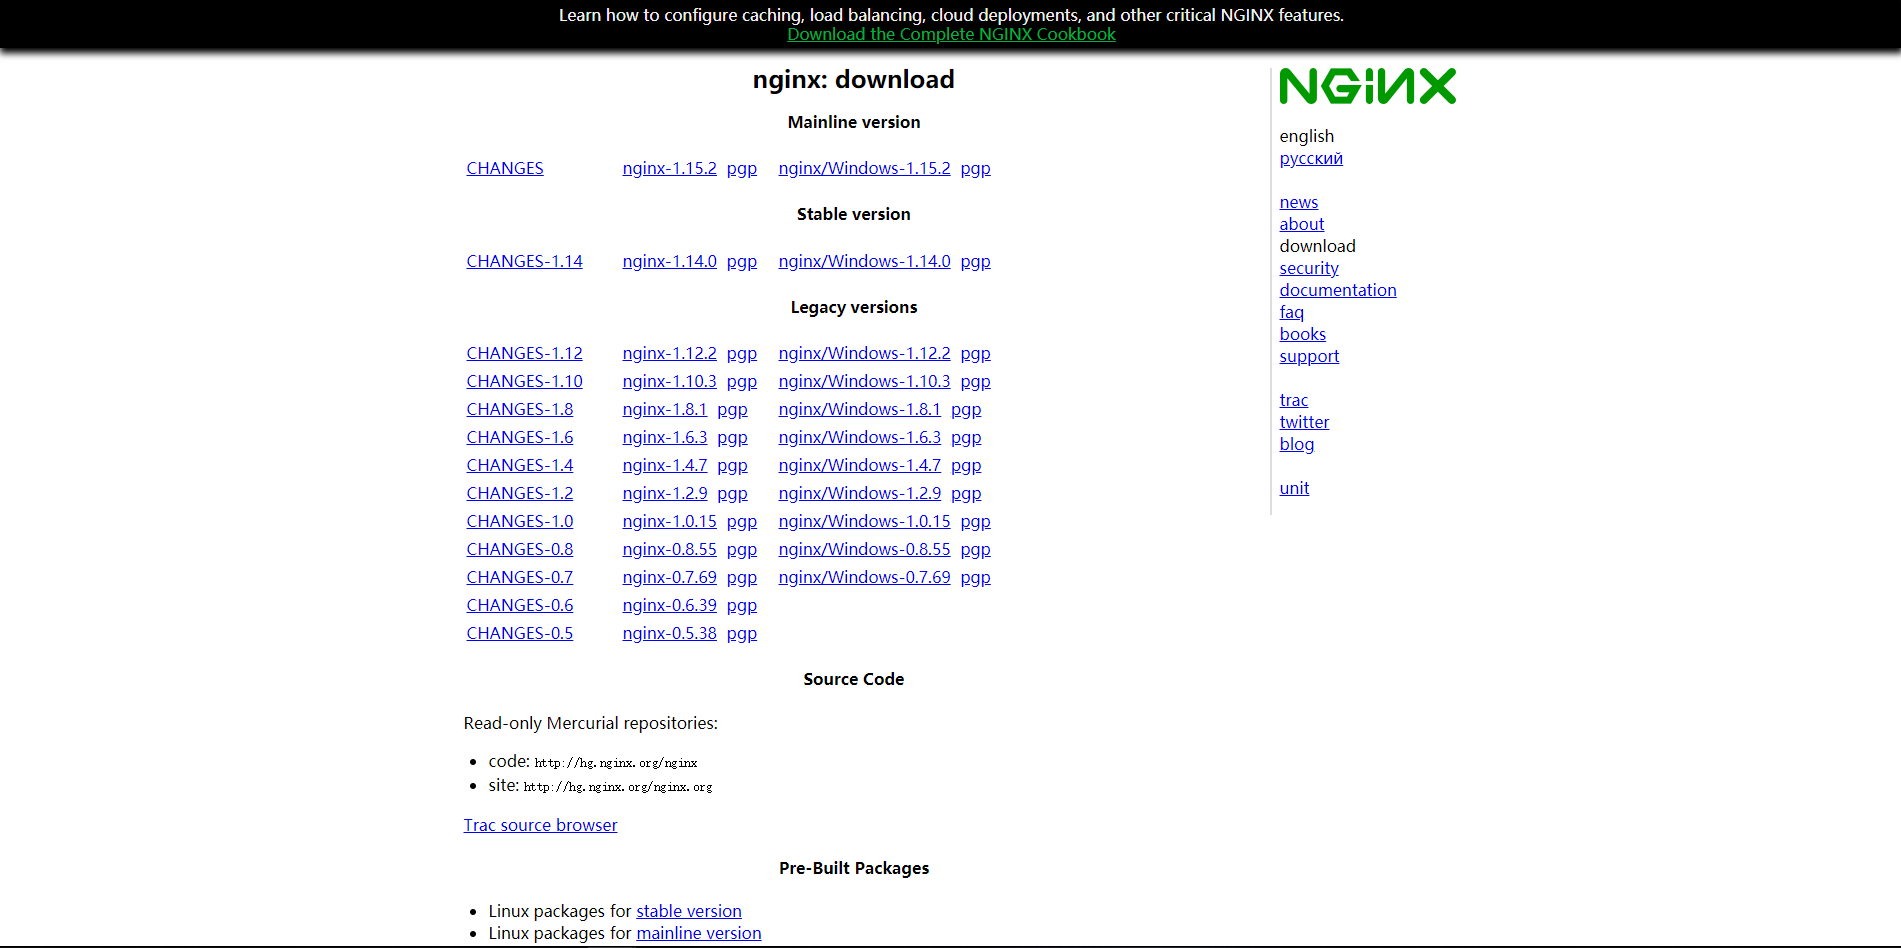
Nginx 下载页面地址:http://nginx.org/en/download.html
1、添加运行 nginx 服务进程的用户
[root@bogon ~]# groupadd -r nginx
[root@bogon ~]# useradd -r -g nginx  nginx
2、下载源码包解压编译
将鼠标放到你想下载的对应版本的文件上方,【右键】->【复制链接地址】, 然后:
进入要存放源码文件的目录:
[root@bogon ~]# cd /usr/local/src下载对应版本的压缩包:
[root@bogon src]# yum install wget
[root@bogon src]# wget http://nginx.org/download/nginx-1.14.0.tar.gz
解压缩:
[root@bogon src]# tar xvf nginx-1.14.0.tar.gz安装依赖包:
[root@bogon src]# yum groupinstall "Development tools"
[root@bogon src]# yum -y install gcc wget gcc-c++ automake autoconf libtool libxml2-devel libxslt-devel perl-devel perl-ExtUtils-Embed pcre-devel openssl-devel
进入解压后的源码目录:
[root@bogon src]# cd nginx-1.14.0配置编译参数:
[root@bogon nginx-1.14.0]# ./configure \
--prefix=/usr/local/nginx \
--sbin-path=/usr/sbin/nginx \
--conf-path=/etc/nginx/nginx.conf \
--error-log-path=/var/log/nginx/error.log \
--http-log-path=/var/log/nginx/access.log \
--pid-path=/var/run/nginx.pid \
--lock-path=/var/run/nginx.lock \
--http-client-body-temp-path=/var/tmp/nginx/client \
--http-proxy-temp-path=/var/tmp/nginx/proxy \
--http-fastcgi-temp-path=/var/tmp/nginx/fcgi \
--http-uwsgi-temp-path=/var/tmp/nginx/uwsgi \
--http-scgi-temp-path=/var/tmp/nginx/scgi \
--user=nginx \
--group=nginx \
--with-pcre \
--with-http_v2_module \
--with-http_ssl_module \
--with-http_realip_module \
--with-http_addition_module \
--with-http_sub_module \
--with-http_dav_module \
--with-http_flv_module \
--with-http_mp4_module \
--with-http_gunzip_module \
--with-http_gzip_static_module \
--with-http_random_index_module \
--with-http_secure_link_module \
--with-http_stub_status_module \
--with-http_auth_request_module \
--with-mail \
--with-mail_ssl_module \
--with-file-aio \
--with-ipv6 \
--with-threads \
--with-stream \
--with-stream_ssl_module
如果没有配置出错,然后进行编译安装:
[root@bogon nginx-1.14.0]# make -j 2 && make install创建 nginx 相关的目录:
[root@bogon nginx-1.14.0]# mkdir -pv /var/tmp/nginx/client3、添加 SysV 启动脚本
[root@bogon ~]# yum install vim
[root@bogon ~]# vim /etc/init.d/nginx
#!/bin/sh
#
# nginx - this script starts and stops the nginx daemon
#
# chkconfig:   - 85 15
# description: Nginx is an HTTP(S) server, HTTP(S) reverse \
#               proxy and IMAP/POP3 proxy server
# processname: nginx
# config:      /etc/nginx/nginx.conf
# config:      /etc/sysconfig/nginx
# pidfile:     /var/run/nginx.pid
# Source function library.
. /etc/rc.d/init.d/functions
# Source networking configuration.
. /etc/sysconfig/network
# Check that networking is up.
[ "$NETWORKING" = "no" ] && exit 0
nginx="/usr/sbin/nginx"
prog=$(basename $nginx)
NGINX_CONF_FILE="/etc/nginx/nginx.conf"
[ -f /etc/sysconfig/nginx ] && . /etc/sysconfig/nginx
lockfile=/var/lock/subsys/nginx
start() {
    [ -x $nginx ] || exit 5
    [ -f $NGINX_CONF_FILE ] || exit 6
    echo -n $"Starting $prog: "
    daemon $nginx -c $NGINX_CONF_FILE
    retval=$?
    echo
    [ $retval -eq 0 ] && touch $lockfile
    return $retval
}
stop() {
    echo -n $"Stopping $prog: "
    killproc $prog -QUIT
    retval=$?
    echo
    [ $retval -eq 0 ] && rm -f $lockfile
    return $retval
killall -9 nginx
}
restart() {
    configtest || return $?
    stop
    sleep 1
    start
}
reload() {
    configtest || return $?
    echo -n $"Reloading $prog: "
    killproc $nginx -HUP
RETVAL=$?
    echo
}
force_reload() {
    restart
}
configtest() {
$nginx -t -c $NGINX_CONF_FILE
}
rh_status() {
    status $prog
}
rh_status_q() {
    rh_status >/dev/null 2>&1
}
case "$1" in
    start)
        rh_status_q && exit 0
    $1
        ;;
    stop)
        rh_status_q || exit 0
        $1
        ;;
    restart|configtest)
        $1
        ;;
    reload)
        rh_status_q || exit 7
        $1
        ;;
    force-reload)
        force_reload
        ;;
    status)
        rh_status
        ;;
    condrestart|try-restart)
        rh_status_q || exit 0
            ;;
    *)
      echo $"Usage: $0 {start|stop|status|restart|condrestart|try-restart|reload|force-reload|configtest}"
        exit 2
esac
4、赋予脚本执行权限。
[root@bogon ~]# chmod +x /etc/init.d/nginx5、添加至服务管理列表,设置开机自启。
[root@bogon ~]# chkconfig --add nginx[root@bogon ~]# chkconfig nginx on6、启动服务。
[root@bogon ~]# systemctl start nginx.service7、开放 firewall 80 端口
[root@bogon ~]# firewall-cmd -query-port=80/tcp
[root@bogon ~]# firewall-cmd --reload
8、浏览器访问可看到默认欢迎页面。
步骤四:安装 MySQL
MySQL下载地址:https://dev.mysql.com/downloads/mysql/
1、准备编译环境。
[root@bogon ~]# yum groupinstall "Server Platform Development"  "Development tools" -y
[root@bogon ~]# yum install cmake -y
2、删除系统中的 mariadb
[root@bogon ~]# rpm -qa | grep mariadb
mariadb-libs-5.5.56-2.el7.x86_64
[root@bogon ~]# rpm -e mariadb-libs-5.5.56-2.el7.x86_64 --nodeps3、解压编译在MySQL官网下载的稳定版源码包
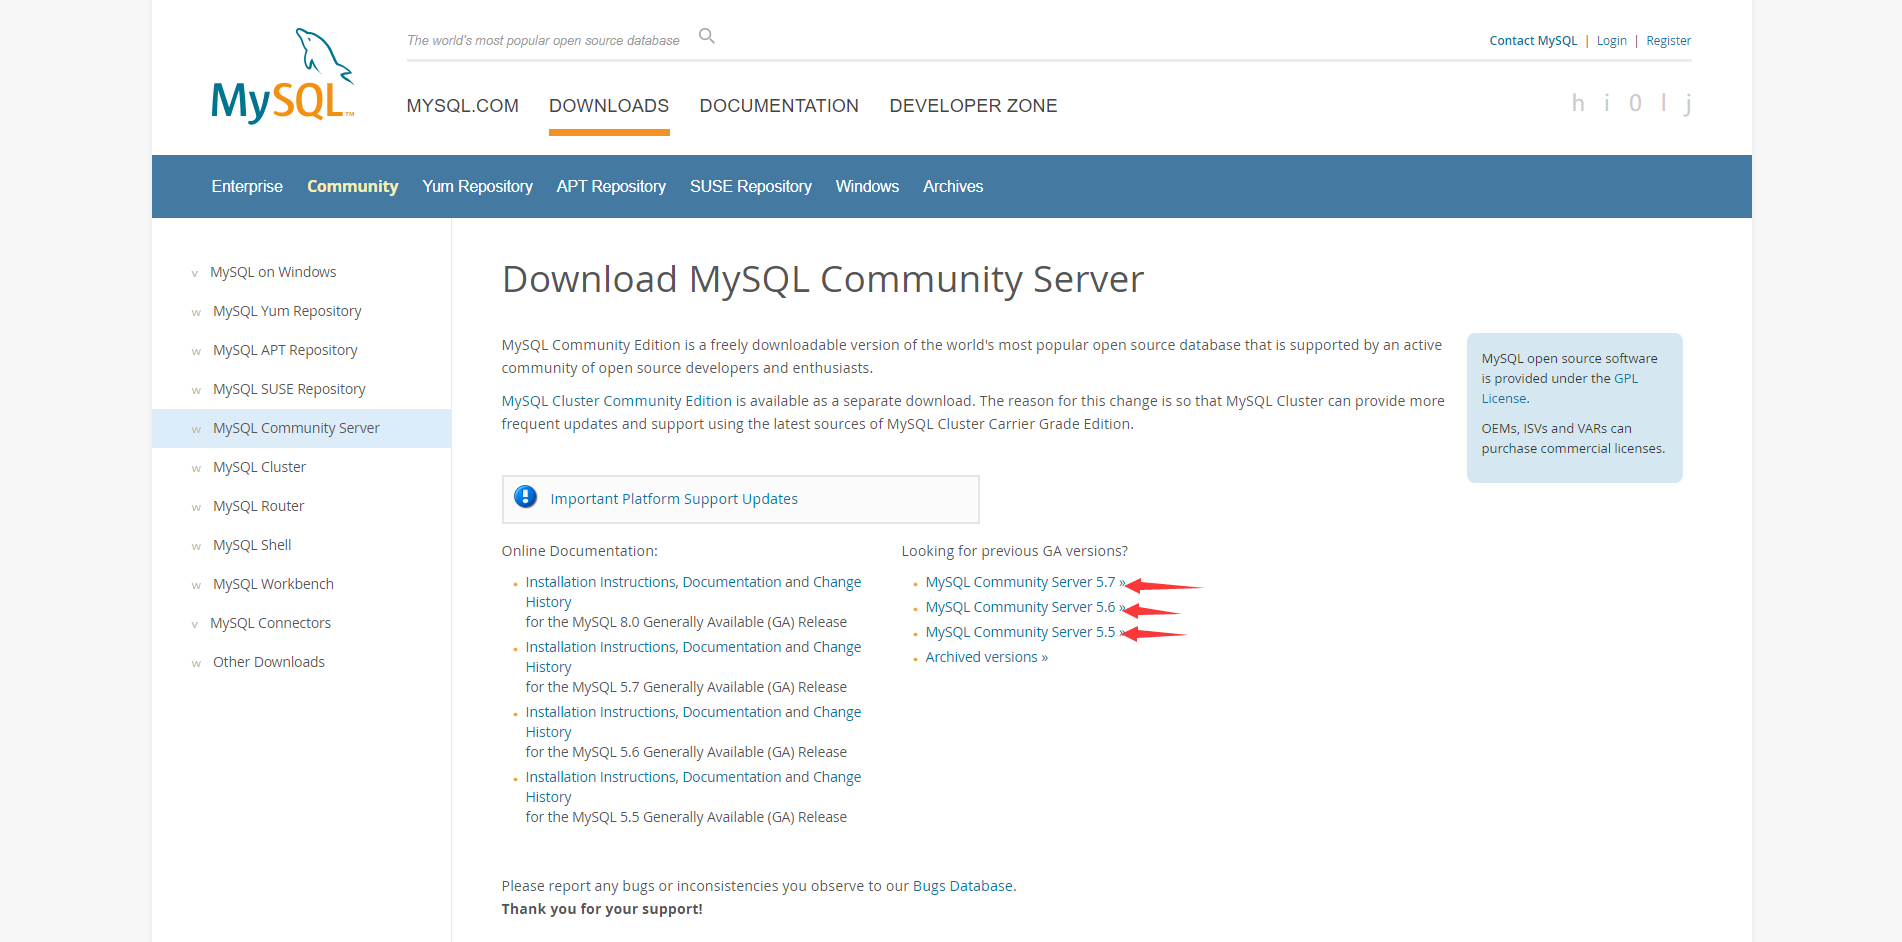
进入MySQL的下载页面:
点击你想要的版本, 因为是编译安装,所以选择Source Code版本:
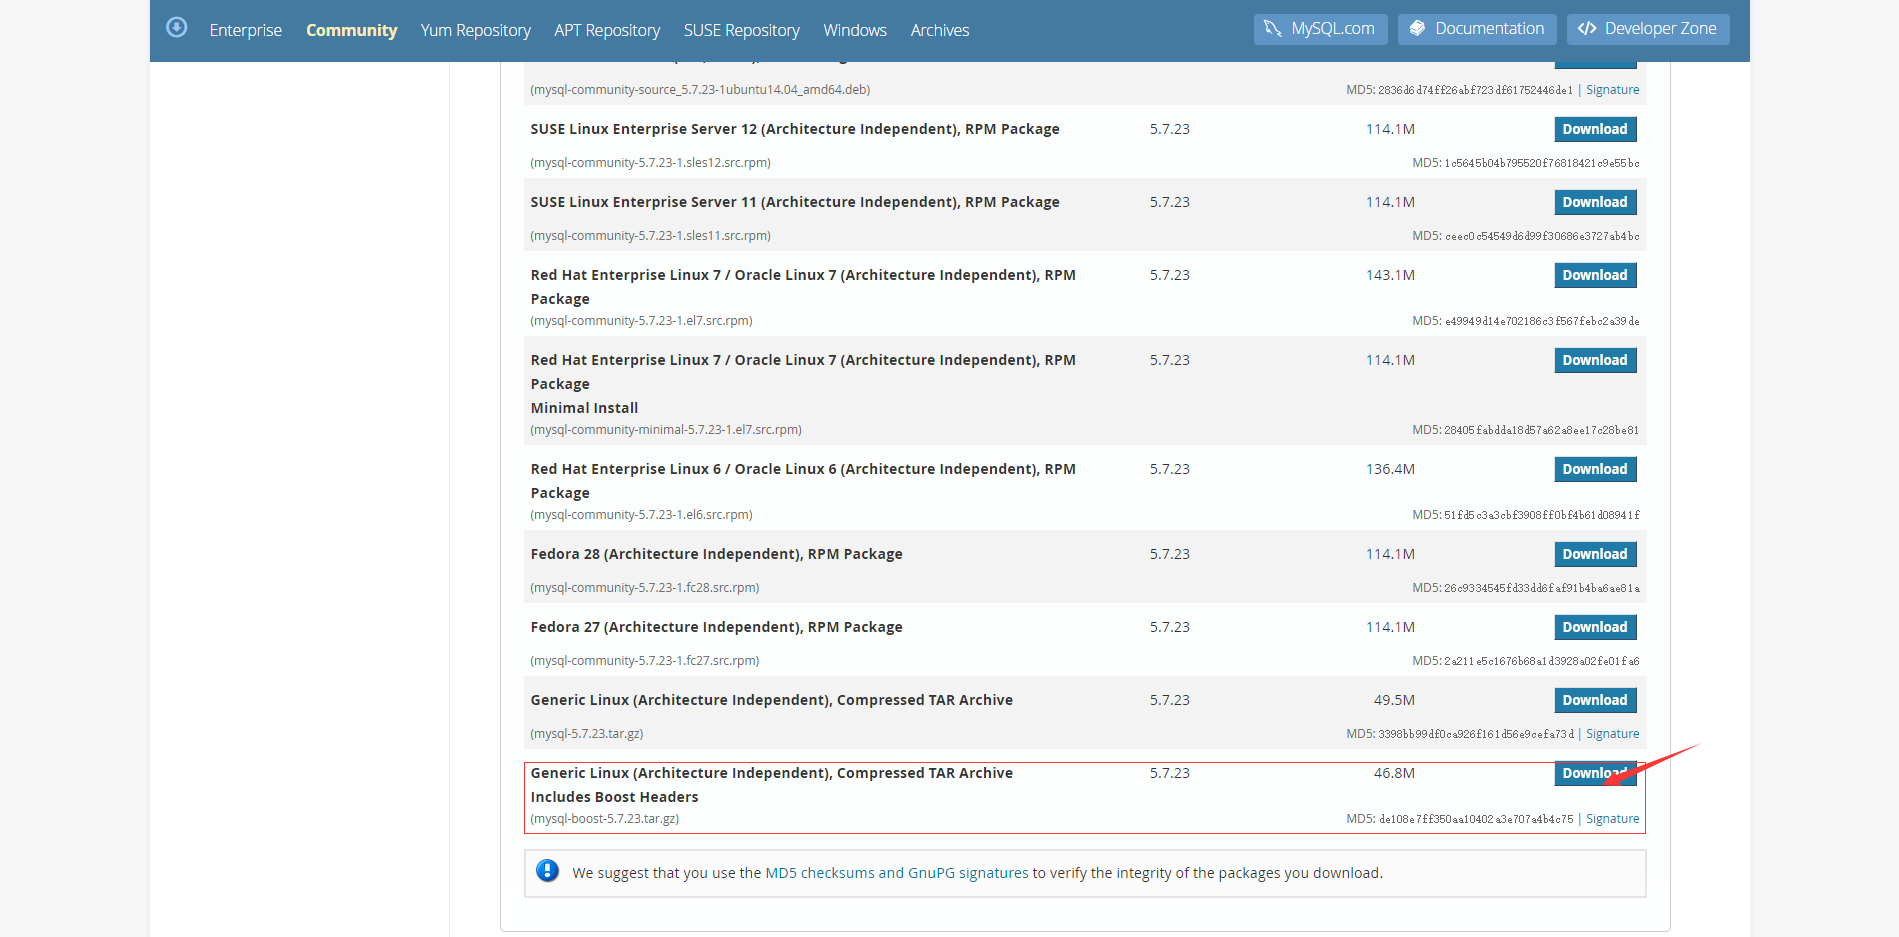
然后将本页面拉到下面,选择下载最下方的一个版本,点击Download:
跳转页面之后,对红框中的链接进行:【右键】->【复制链接地址】
打开终端,切换目录:
[root@bogon ~]# cd /usr/local/src下载压缩包:
[root@bogon src]# wget -c https://dev.mysql.com/get/Downloads/MySQL-5.7/mysql-boost-5.7.23.tar.gz解压缩:
[root@bogon src]# tar zxvf mysql-boost-5.7.23.tar.gz进入解压缩后的目录:
[root@bogon src]# cd /usr/local/src/mysql-5.7.23配置编译参数:
[root@bogon mysql-5.7.23]# cmake \
-DCMAKE_INSTALL_PREFIX=/usr/local/mysql \
-DMYSQL_DATADIR=/data/mysql \
-DSYSCONFDIR=/etc \
-DMYSQL_UNIX_ADDR=/usr/local/mysql/mysql.sock \
-DEXTRA_CHARSETS=all \
-DDEFAULT_CHARSET=utf8 \
-DDEFAULT_COLLATION=utf8_general_ci \
-DWITH_BOOST=boost \
-DWITH_MYISAM_STORAGE_ENGINE=1 \
-DWITH_INNOBASE_STORAGE_ENGINE=1 \
-DMYSQL_TCP_PORT=3306 \
-DENABLED_LOCAL_INFILE=1 \
-DWITH_PARTITION_STORAGE_ENGINE=1 \
-DWITH_EMBEDDED_SERVER=OFF \
-DWITH_SYSTEMD=1
参数说明如下:
cmake  \
-DCMAKE_INSTALL_PREFIX=/usr/local/mysql \           #[MySQL安装的根目录]
-DMYSQL_DATADIR=/data/mysql \                       #[MySQL数据库文件存放目录]
-DSYSCONFDIR=/etc \                                 #[MySQL配置文件所在目录]
-DMYSQL_UNIX_ADDR=/usr/local/mysql/mysql.sock \     #[MySQL的sock文件目录]
-DEXTRA_CHARSETS=all \                              #[使MySQL支持所有的扩展字符]
-DDEFAULT_CHARSET=utf8  \                           #[设置默认字符集为utf8]
-DDEFAULT_COLLATION=utf8_general_ci  \              #[设置默认字符校对]
-DWITH_BOOST=boost \                                #[指定boost安装路径]
-DWITH_MYISAM_STORAGE_ENGINE=1 \
-DWITH_INNOBASE_STORAGE_ENGINE=1 \
-DMYSQL_TCP_PORT=3306 \                             #[MySQL的监听端口]
-DENABLED_LOCAL_INFILE=1 \                          #[启用加载本地数据]
-DWITH_PARTITION_STORAGE_ENGINE=1 \
-DWITH_EMBEDDED_SERVER=OFF \
-DWITH_SYSTEMD=1                                    #[用systemd管理mysql]
编译:
编译时会占用大量的系统资源,建议使用多个核心同时进行编译,否则可能会编译失败。
#查看服务器cpu数
[root@bogon mysql-5.7.23]# grep processor /proc/cpuinfo | wc -l
2
[root@bogon mysql-5.7.23]# make -j 2
[root@bogon mysql-5.7.23]# echo $? #0代表没有错误
0
[root@bogon mysql-5.7.23]# make install
[root@bogon mysql-5.7.23]# echo $? #0代表没有错误
0
4、创建 mysql 用户及相关目录, 并更改权限。
[root@bogon mysql-5.7.23]# groupadd -g 1000 mysql
[root@bogon mysql-5.7.23]# useradd -g 1000 -M -s /sbin/nologin -u 1000 mysql
[root@bogon mysql-5.7.23]# id mysql
uid=1000(mysql) gid=1000(mysql) 组=1000(mysql)
[root@bogon mysql-5.7.23]# mkdir -p /usr/local/mysql/log/
[root@bogon mysql-5.7.23]# mkdir -p /usr/local/mysql/run/
[root@bogon mysql-5.7.23]# mkdir -p /usr/local/mysql/log/binlog/
[root@bogon mysql-5.7.23]# mkdir -p /data/mysql
[root@bogon mysql-5.7.23]# chown -R mysql: /usr/local/mysql/
[root@bogon mysql-5.7.23]# chown -R mysql: /data/mysql
5、将 mysqld.servie 复制到 /usr/lib/systemd/system/
[root@bogon mysql-5.7.23]# cp /usr/local/mysql/usr/lib/systemd/system/mysqld.service   /usr/lib/systemd/system/
[root@bogon mysql-5.7.23]# vim /usr/lib/systemd/system/mysqld.service
#修改pid-file
PIDFile=/usr/local/mysql/run/mysqld.pid
ExecStart=/usr/local/mysql/bin/mysqld --daemonize --pid-file=/usr/local/mysql/run/mysqld.pid $MYSQLD_OPTS
6、创建配置文件。
[root@bogon  mysql-5.7.23]# vim /etc/my.cnf
[mysqld]
basedir=/usr/local/mysql
datadir=/data/mysql
socket=/usr/local/mysql/mysql.sock
log_error=/usr/local/mysql/log/mysql_err.log
pid-file=/usr/local/mysql/run/mysqld.pid
explicit_defaults_for_timestamp=true

#禁用主机名解析
skip-name-resolve
#默认的数据库引擎
default-storage-engine=InnoDB
#不区分大小写
lower_case_table_names= 1
#开启binlog日志功能
server-id=1
log-bin=/usr/local/mysql/log/binlog/mysql57-bin
relay-log=/usr/local/mysql/log/binlog/mysql57-relay-bin
binlog-cache-size= 4M #设置二进制日志缓存大小
max_binlog_cache_size= 8M #最大的二进制Cache日志缓冲尺寸
max_binlog_size= 1G #单个二进制日志文件的最大值,默认1G,最大1G
sync-binlog= 1 #每隔N秒将缓存中的二进制日志记录写回磁盘
binlog_format= mixed #二进制日志格式(mixed(混合、row(行)、statement))
expire_logs_days= 30 #二进制日志文件过期时间

back_log= 50 #指出在MySQL暂时停止响应新请求之前,短时间内的多少个请求.默认是50
open_files_limit= 65535 #Mysql能打开文件的最大个数
max_connections= 1000 #指定Mysql允许的最大连接进程数
max_connect_errors= 1000 #设置每个主机的连接请求异常中断的最大次数
max_allowed_packet= 16M #服务器一次能处理的最大的查询包的值
wait_timeout= 120 #指定一个请求的最大连接时间
interactive_timeout =8 #连接保持活动的时间
thread_stack= 192k #设置Mysql每个线程的堆大小,默认值足够大,可满足普通用户操作

max_binlog_size= 1G #单个二进制日志文件的最大值,默认1G,最大1G
sync-binlog= 1 #每隔N秒将缓存中的二进制日志记录写回磁盘
binlog_format= mixed #二进制日志格式(mixed(混合、row(行)、statement))
expire_logs_days= 30 #二进制日志文件过期时间

back_log= 50 #指出在MySQL暂时停止响应新请求之前,短时间内的多少个请求.默认是50
open_files_limit= 65535 #Mysql能打开文件的最大个数
max_connections= 1000 #指定Mysql允许的最大连接进程数
max_connect_errors= 1000 #设置每个主机的连接请求异常中断的最大次数
max_allowed_packet= 16M #服务器一次能处理的最大的查询包的值
wait_timeout= 28800 #指定一个请求的最大连接时间
interactive_timeout =28800 #连接保持活动的时间
thread_stack= 192k #设置Mysql每个线程的堆大小,默认值足够大,可满足普通用户操作

slow_query_log=on #开启慢查询
long_query_time= 2 #指定多少秒未返回结果的查询属于慢查询
slow_query_log_file= /usr/local/mysql/log/mysql57-slow.log #指定慢查询日志文件路径
log-queries-not-using-indexes #记录所有没有使用到索引的查询语句
min_examined_row_limit= 1000 #记录那些由于查到了多余1000次而引发的慢查询
log-slow-admin-statements #记录那些慢的OPTIMIZE TABLE,ANALYZE TABLE和ALTER

key_buffer_size= 32M #指定用于索引的缓冲区大小,增加它可得到更好的索引处理性能
sort_buffer_size= 2M #设置查询排序时所能使用的缓冲区大小,系统默认大小为2MB
join_buffer_size= 2M #联合查询操作所能使用的缓冲区大小
read_buffer_size= 4M #读查询操作所能使用的缓冲区大小
read_rnd_buffer_size= 16M #设置进行随机读的时候所使用的缓冲区
bulk_insert_buffer_size= 8M #若经查使用批量插入的特殊语句来插入数据,可以适当调整参数至16MB-32MB,建议8MB

table_open_cache= 512 #设置高速缓存表的数目
tmp_table_size= 64M #设置内存临时表最大值
max_heap_table_size= 64M #独立的内存表所允许的最大容量
query_cache_size= 32M #指定Mysql查询缓冲区的大小
query_cache_limit= 2M #只有小于此设置值的结果才会被缓存
query_cache_min_res_unit= 2k #设置查询缓存分配内存的最小单位
7、添加环境变量。
[root@bogon mysql-5.7.23]# echo "export PATH=/usr/local/mysql/bin:\$PATH" > /etc/profile.d/mysql.sh
[root@bogon mysql-5.7.23]# source /etc/profile
8、初始化数据库。
[root@bogon mysql-5.7.23]# /usr/local/mysql/bin/mysqld --initialize-insecure --user=mysql --basedir=/usr/local/mysql --datadir=/data/mysql--initialize 会生成一个随机密码,而 -–initialize-insecure 不会生成密码,在MySQL安全配置向导mysql_secure_installation设置密码时,可自由选择 mysql 密码等级。
--datadir目标目录下不能有数据文件。9、启动数据库。
[root@bogon mysql-5.7.23]# systemctl start mysqld.service
[root@bogon mysql-5.7.23]# systemctl status mysqld
● mysqld.service - MySQL Server
   Loaded: loaded (/usr/lib/systemd/system/mysqld.service; disabled; vendor preset: disabled)
   Active: active (running) since 三 2018-08-15 11:27:11 CST; 7s ago
     Docs: man:mysqld(8)
           http://dev.mysql.com/doc/refman/en/using-systemd.html
  Process: 2297 ExecStart=/usr/local/mysql/bin/mysqld --daemonize --pid-file=/usr/local/mysql/run/mysqld.pid $MYSQLD_OPTS (code=exited, status=0/SUCCESS)
  Process: 2280 ExecStartPre=/usr/local/mysql/bin/mysqld_pre_systemd (code=exited, status=0/SUCCESS)
 Main PID: 2300 (mysqld)
   CGroup: /system.slice/mysqld.service
           └─2300 /usr/local/mysql/bin/mysqld --daemonize --pid-file=/usr/local/mysql/run/mysqld.pid

8月 15 11:27:11 localhost.localdomain systemd[1]: Starting MySQL Server...
8月 15 11:27:11 localhost.localdomain systemd[1]: Started MySQL Server.
10、配置安全向导。
[root@bogon mysql-5.7.23]# mysql_secure_installation

Securing the MySQL server deployment.

Connecting to MySQL using a blank password.

VALIDATE PASSWORD PLUGIN can be used to test passwords
and improve security. It checks the strength of password
and allows the users to set only those passwords which are
secure enough. Would you like to setup VALIDATE PASSWORD plugin?

Press y|Y for Yes, any other key for No: y

There are three levels of password validation policy:

LOW    Length >= 8
MEDIUM Length >= 8, numeric, mixed case, and special characters
STRONG Length >= 8, numeric, mixed case, special characters and dictionary                  file

Please enter 0 = LOW, 1 = MEDIUM and 2 = STRONG: 0
Please set the password for root here.

New password:

Re-enter new password:

Estimated strength of the password: 50
Do you wish to continue with the password provided?(Press y|Y for Yes, any other key for No) : y
By default, a MySQL installation has an anonymous user,
allowing anyone to log into MySQL without having to have
a user account created for them. This is intended only for
testing, and to make the installation go a bit smoother.
You should remove them before moving into a production
environment.

Remove anonymous users? (Press y|Y for Yes, any other key for No) : y
Success.


Normally, root should only be allowed to connect from
'localhost'. This ensures that someone cannot guess at
the root password from the network.

Disallow root login remotely? (Press y|Y for Yes, any other key for No) : n

 ... skipping.
By default, MySQL comes with a database named 'test' that
anyone can access. This is also intended only for testing,
and should be removed before moving into a production
environment.


Remove test database and access to it? (Press y|Y for Yes, any other key for No) : y
 - Dropping test database...
Success.

 - Removing privileges on test database...
Success.

Reloading the privilege tables will ensure that all changes
made so far will take effect immediately.

Reload privilege tables now? (Press y|Y for Yes, any other key for No) : y
Success.

All done!
11、测试链接。
[root@bogon mysql-5.7.23]# mysql -u root -p
Enter password:
Welcome to the MySQL monitor.  Commands end with ; or \g.
Your MySQL connection id is 4
Server version: 5.7.23-log Source distribution

Copyright (c) 2000, 2018, Oracle and/or its affiliates. All rights reserved.

Oracle is a registered trademark of Oracle Corporation and/or its
affiliates. Other names may be trademarks of their respective
owners.

Type 'help;' or '\h' for help. Type '\c' to clear the current input statement.

mysql> show databases;
+--------------------+
| Database           |
+--------------------+
| information_schema |
| mysql              |
| performance_schema |
| sys                |
+--------------------+
4 rows in set (0.00 sec)
12、开放 Root 远程连接权限。
mysql> use mysql
Reading table information for completion of table and column names
You can turn off this feature to get a quicker startup with -A

Database changed
mysql> select host,user from user;
+-----------+---------------+
| host      | user          |
+-----------+---------------+
| localhost | mysql.session |
| localhost | mysql.sys     |
| localhost | root          |
+-----------+---------------+
3 rows in set (0.00 sec)

mysql> grant all privileges on *.* to 'root'@'%' identified by 'password';
Query OK, 0 rows affected, 1 warning (0.00 sec)

mysql> flush privileges;
Query OK, 0 rows affected (0.00 sec)

mysql> select host,user from user;
+-----------+---------------+
| host      | user          |
+-----------+---------------+
| %         | root          |
| localhost | mysql.session |
| localhost | mysql.sys     |
| localhost | root          |
+-----------+---------------+
4 rows in set (0.00 sec)

mysql> exit;
Bye
13、开放 3306 端口。
[root@bogon mysql-5.7.23]# firewall-cmd --add-port=3306/tcp --permanent
success
[root@bogon mysql-5.7.23]# firewall-cmd --reload
success
14、开机重启。
[root@bogon mysql-5.7.23]# chkconfig mysqld  on
注意:正在将请求转发到“systemctl enable mysqld.service”。
Created symlink from /etc/systemd/system/multi-user.target.wants/mysqld.service to /usr/lib/systemd/system/mysqld.service.
步骤五:安装 PHP-FPM
Nginx 本身不能处理 PHP,作为 Web 服务器,当它接收到请求后,不支持对外部程序的直接调用或者解析,必须通过 FastCGI 进行调用。如果是 PHP 请求,则交给 PHP 解释器处理,并把结果返回给客户端。PHP-FPM 是支持解析 PHP 的一个 FastCGI 进程管理器。提供了更好管理 PHP 进程的方式,可以有效控制内存和进程、可以平滑重载 PHP 配置。
1、安装依赖包。
[root@bogon ~]# yum install libmcrypt libmcrypt-devel mhash mhash-devel libxml2 libxml2-devel bzip2 bzip2-devel2、从官网下载的源码包,解压缩并编译安装。
PHP (7.1.20) 下载页面:http://php.net/get/php-7.1.20.tar.gz/from/a/mirror
选择一个镜像源,【右键】->【复制链接地址】:
切换到存放源码的目录:
[root@bogon ~]# cd /usr/local/src下载压缩包:
[root@bogon src]# wget -c http://cn2.php.net/get/php-7.1.20.tar.gz/from/this/mirror下载好以后,这个压缩包的文件名是 mirror, 但是它其实是一个 .tar.gz 的压缩包,所以将它解压缩:
[root@bogon src]# tar -zxvf mirror 安装 curl:
[root@bogon src]# wget https://curl.haxx.se/download/curl-7.29.0.tar.gz
[root@bogon src]# tar -zxvf curl-7.29.0.tar.gz
[root@bogon src]# cd curl-7.29.0
[root@bogon curl-7.29.0]# ./configure --prefix=/usr/local/curl
[root@bogon curl-7.29.0]# make && make install
[root@bogon curl-7.29.0]# curl --version
curl 7.29.0 (x86_64-redhat-linux-gnu) libcurl/7.29.0 NSS/3.34 zlib/1.2.7 libidn/1.28 libssh2/1.4.3
Protocols: dict file ftp ftps gopher http https imap imaps ldap ldaps pop3 pop3s rtsp scp sftp smtp smtps telnet tftp
Features: AsynchDNS GSS-Negotiate IDN IPv6 Largefile NTLM NTLM_WB SSL libz unix-sockets
进入解压缩后的目录:
[root@bogon curl-7.29.0]# cd ../php-7.1.20/配置编译参数:
[root@bogon php-7.1.20]# ./configure --prefix=/usr/local/php \
> --with-config-file-scan-dir=/etc/php.d \
> --with-config-file-path=/etc \
> --with-mysqli=/usr/local/mysql \
> --with-mysqli=/usr/local/mysql/bin/mysql_config \
> --with-pdo-mysql=/usr/local/mysql \
> --enable-mbstring \
> --with-freetype-dir \
> --with-jpeg-dir \
> --with-png-dir \
> --with-zlib \
> --with-libxml-dir=/usr \
> --with-openssl \
> --enable-xml \
> --enable-sockets \
> --enable-fpm \
> --with-mcrypt \
> --with-bz2 \
> --with-curl=/usr/local/curl
编译安装:
[root@bogon php-7.1.20]# echo $?
0
[root@bogon php-7.1.20]# make -j 2
[root@bogon php-7.1.20]# make install
如果你使用的是配置比较低,内存比较小的服务器,可能到编译这一步就会卡掉,因为在前面已经启动了 MySQL ,MySQL的内存占用很高,我的服务器内存是 1 个 G ,MySQL的内存占用是 45.6% ,如果出现编译停止,报 fileinfo 扩展的错误,请先停止MySQL服务,等 PHP 安装完后再将其启动。3、添加 php 和 php-fpm 配置文件。
[root@bogon php-7.1.20]# cp /usr/local/php/etc/php-fpm.d/www.conf.default /usr/local/php/etc/php-fpm.d/www.conf
[root@bogon php-7.1.20]# cp /usr/local/src/php-7.1.20/php.ini-production /etc/php.ini
[root@bogon php-7.1.20]# cd /usr/local/php/etc/
[root@bogon etc]# cp php-fpm.conf.default php-fpm.conf
[root@bogon etc]# sed -i 's@;pid = run/php-fpm.pid@pid = /usr/local/php/var/run/php-fpm.pid@' php-fpm.conf
4、添加 php-fpm 启动脚本,并赋予脚本执行权限:
[root@bogon etc]# cp /usr/local/src/php-7.1.20/sapi/fpm/init.d.php-fpm /etc/init.d/php-fpm
[root@bogon etc]# chmod +x /etc/init.d/php-fpm
5、添加 php-fpm 至服务列表并设置开机自启。
[root@bogon etc]# chkconfig --add php-fpm
[root@bogon etc]# chkconfig --list php-fpm
[root@bogon etc]# chkconfig php-fpm on
6、启动服务。
[root@bogon php-fpm.d]# systemctl start php-fpm.service7、添加 nginx 对 fastcgi 的支持,首先备份默认的配置文件。
[root@bogon php-fpm.d]# cp /etc/nginx/nginx.conf /etc/nginx/nginx.confbak
[root@bogon php-fpm.d]# cp /etc/nginx/nginx.conf.default /etc/nginx/nginx.conf
cp:是否覆盖"/etc/nginx/nginx.conf"? y
编辑 /etc/nginx/nginx.conf ,在所支持的主页面格式中添加 php 格式的主页,类似如下:
[root@bogon php-fpm.d]# vim /etc/nginx/nginx.conf
location / {
           root   /usr/local/nginx/html;
           index  index.php index.html index.htm;
       }
取消以下内容前面的注释:
location ~ \.php$ {
          root           /usr/local/nginx/html;
          fastcgi_pass    127.0.0.1:9000;
          fastcgi_index   index.php;
          fastcgi_param  SCRIPT_FILENAME  /usr/local/nginx/html/$fastcgi_script_name;
          include        fastcgi_params;
      }
重新载入 nginx 的配置文件:
[root@bogon php-fpm.d]# systemctl reload nginx.service在 /usr/local/nginx/html/ 新建 index.php 的测试页面,内容如下。
[root@bogon php-fpm.d]# vim /usr/local/nginx/html/index.php
<?php
phpinfo();
浏览器访问测试,如看到以下内容则表示 LNMP 平台构建完成。
本文链接:https://www.masterzc.cn/archives/82.html
本站使用「署名 4.0 国际」创作共享协议,可自由转载、引用,但需署名作者且注明文章出处